- Restart the computer.
- Login with an administrative account (not the account that is having the problem).
- Rename the ntuser.dat file (to something like ntuser.old1) for the
user that is having the problem (C:\Users\%username%\ntuser.dat).
- Log off and login with the user account, a temporary profile should be created.
- Log off and login with the previous administrative account.
- Open REGEDIT and go to: HKEY_LOCAL_MACHINE\SOFTWARE\Microsoft\Windows NT\CurrentVersion\ProfileList
There should be a profile under that key that has .bak after the SID
number (e.g. S-1-5-21-245852018-2450494779-245611912-1000.bak).
- Select the key and check the ProfileImagePath string value relates
to the correct user then delete the SID key (that ends with .bak).
- Restart and login with the affected user account, they should be able to login now.
Minggu, 17 Agustus 2014

Jumat, 15 Agustus 2014
Delete HDD via Command Prompt
DISKPART> list disk
Disk ### Status Size Free Dyn Gpt
——– ————- ——- ——- — —
Disk 0 Online 298 GB 0 B
Disk 1 Online 7640 MB 0 B
Disk 2 Online 298 GB 285 GB
DISKPART> SELECT DISK 2
Disk 2 is now the selected disk.
DISKPART> LIST PARTITION
Partition ### Type Size Offset
————- —————- ——- ——-
Partition 1 Recovery 13 GB 1024 KB
DISKPART> SELECT PARTITION 1
Partition 1 is now the selected partition.
DISKPART> DETAIL PARTITION
Partition 1
Type : 27
Hidden: Yes
Active: No
Offset in Bytes: 1048576
Volume ### Ltr Label Fs Type Size Status Info
———- — ———– —– ———- ——- ——— ——–
* Volume 5 PQSERVICE NTFS Partition 13 GB Healthy Hidden
DISKPART> INACTIVE
The current partition is already marked inactive.
(I didn’t need to do set inactive in this case, but it does not hurt anything to run it just in case…)
DISKPART> DELETE PARTITION OVERRIDE
DiskPart successfully deleted the selected partition.
DISKPART>
Disk ### Status Size Free Dyn Gpt
——– ————- ——- ——- — —
Disk 0 Online 298 GB 0 B
Disk 1 Online 7640 MB 0 B
Disk 2 Online 298 GB 285 GB
DISKPART> SELECT DISK 2
Disk 2 is now the selected disk.
DISKPART> LIST PARTITION
Partition ### Type Size Offset
————- —————- ——- ——-
Partition 1 Recovery 13 GB 1024 KB
DISKPART> SELECT PARTITION 1
Partition 1 is now the selected partition.
DISKPART> DETAIL PARTITION
Partition 1
Type : 27
Hidden: Yes
Active: No
Offset in Bytes: 1048576
Volume ### Ltr Label Fs Type Size Status Info
———- — ———– —– ———- ——- ——— ——–
* Volume 5 PQSERVICE NTFS Partition 13 GB Healthy Hidden
DISKPART> INACTIVE
The current partition is already marked inactive.
(I didn’t need to do set inactive in this case, but it does not hurt anything to run it just in case…)
DISKPART> DELETE PARTITION OVERRIDE
DiskPart successfully deleted the selected partition.
DISKPART>
Using a command line
- Open Command Prompt.
- Type:
diskpart - At the DISKPART prompt,
type:
list disk
Make note of the disk number of the disk from which you want to delete the partition. - At the DISKPART prompt,
type:
select diskn
Select the disk n from which you want to delete the partition. - At the DISKPART prompt,
type:
list partition
Make note of the number of the partition that you want to delete. - At the DISKPART prompt,
type:
select partitionn
Select the partition n that you want to delete. - At the DISKPART prompt,
type:
delete partition
Selasa, 05 Agustus 2014
Continual pop-up in Word 'Connecting to Office.Microsoft.com' asking for credentials
Starting today when running Word, I am continually receiving the
‘Connecting ....’ message below. I have been running Office Home/Student
2010 for the past 4 years and have changed nothing in that time. I have
tried repairing Office but a file is apparently
missing. I have removed all entries from Credential Manager and I’m not
running a Proxy Server.
What could it be?
Thank you.

What could it be?
Thank you.
This problem may be caused by the translation service crash. Please use another service site to replace the current one.
Here you go:
Here you go:
- Windows + R, type regedit, press Enter
- Go to registry path HKEY_CURRENT_USER\Software\Microsoft\Office\14.0\Common\Research\Sources\{88686849-2DD9-474D-9300-778E3336FA5D}
- Change both QueryPath and RegistrationPath from http://office.microsoft.com/Research/query.asmx to http://rr.office.microsoft.com/Research/query.asmx
- Restart the Word 2010.
Kamis, 10 Juli 2014
Information Rights Management trial service for Office is disrupted by certification error
This service is temporarily unavailable. Ensure that you have connectivity to the server. This error could be caused because you are working offline, your proxy settings are preventing your connection, or you are experiencing intermittent network issues.
Follow these steps, and then exit Registry Editor:
- Click Start, click Run, type regedit, and then click OK.
- Locate and then click the following registry key, depending on the version of Office.
For Office 2003:For 2007 Office system:
HKEY_LOCAL_MACHINE\Software\Microsoft\Office\11.0\Common\DRMFor Office 2010:
HKEY_LOCAL_MACHINE\Software\Microsoft\Office\12.0\Common\DRMFor 32-bit editions of Office 2010 running on 64-bit versions of Windows:
HKEY_LOCAL_MACHINE\Software\Microsoft\Office\14.0\Common\DRM
HKEY_LOCAL_MACHINE\Software\Wow6432Node\Microsoft\Office\14.0\Common\DRM - On the Edit menu, point to New, and then click String value.
- Type CloudCertificationServer, and then press ENTER.
- On the Edit menu, click Modify.
- Type https://certification.drm.microsoft.com/certification, and then click OK.
Senin, 07 Juli 2014
Error message when you try to open or save an e-mail attachment in Outlook: "Cannot create file"
Outlook 2003
If you are using Outlook 2003, follow these steps:- Click My Computer, and then double-click drive C.
- On the File menu, click New, and then click Folder.
- Name the folder temp0.
- Click Start, click Run, type regedit, and then click OK.
- Locate and then click the following registry key:
HKEY_CURRENT_USER\Software\Microsoft\Office\11.0\Outlook\Security\
- In the right pane, double-click OutlookSecureTempFolder.
- In the Value Data field, type C:\temp0\ and then click OK.
- Exit Registry Editor.
- Restart the computer.
Outlook 2010
If you are using Outlook 2010, follow these steps:
- Click My Computer, and then double-click drive C.
- On the File menu, click New, and then click Folder.
- Name the folder temp0.
- Click Start, click Run, type regedit, and then click OK.
- Locate and then click the following registry key:
HKEY_CURRENT_USER\Software\Microsoft\Office\14.0\Outlook\Security\
- In the right pane, double-click OutlookSecureTempFolder.
- In the Value Data field, type C:\temp0\ and then click OK.
- Exit Registry Editor.
- Restart the computer.
Rabu, 19 Maret 2014
How to reset the icon cache in Windows 7, 8 and Vista
When the desktop icons gets messed up, you probably don't need to reinstall the programs (or Windows!) - you just need to reset the iconcache file. It's a fairly easily process too - easier than reinstalling the applications.
- Close all Windows explorer windows that are open.
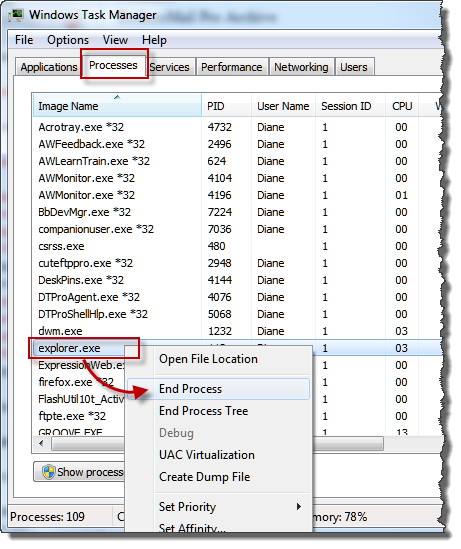
- Right click on task bar and choose Task Manager
- Switch to Processes tab and right-click on the Explorer.exe process and select End Process and confirm.
- On File menu of Task Manager, select New Task (Run…)
- Type CMD.EXE, click OK
- In the Command Prompt window, type or copy and paste these commands one by one, pressing Enter after each command:
- Back in Task Manager, go to File, select New Task (Run…)
- Type explorer.exe and press Enter.

CD /d %userprofile%\AppData\Local
DEL IconCache.db
EXIT
DEL IconCache.db
EXIT
Selasa, 04 Februari 2014
Delete Profile Wireless
How to Delete a Wireless Network Profile in Windows 8 and 8.1
 Information
A
wireless (Wi-Fi) network profile contains the SSID (network name),
password key, and security information to be able to connect to the
wireless network.
This tutorial will show you how to delete a wireless network connection profile created in Windows 8, Windows RT, Windows 8.1, and Windows RT 8.1.
This tutorial will show you how to delete a wireless network connection profile created in Windows 8, Windows RT, Windows 8.1, and Windows RT 8.1.
 OPTION ONE
1. Do step 2 or 3 below for how you would like to open the "Networks" flyout.
2. On your desktop, click/tap on the Network icon in the taskbar notification area, and go to step 4 below. (see screenshot below)

3. Open the Charms bar, click/tap on Settings, click/tap on the Network icon, and go to step 4 below. (see screenshot below)

4. Do step 5 or 6 below depending on what Windows you have.
5. In Windows 8 or Windows RT, right click or press and hold on the wireless network (ex: Brink-Router) in the network list, click/tap on Forget this network, and go to step 7 below. (see screenshot below)
 Note
Note
Windows does not provide the option to "Forget this network" if this is for a Mobile Broadband profile that is provisioned by the carrier. The option only appears when a custom or user profile is created.
"Forget this network" will not be available for the listed wireless networks that you didn't create a network connection profile for.
"Forget this network" will not be available for the listed wireless networks that you didn't create a network connection profile for.

6. In Windows 8.1 or Windows RT 8.1, click/tap on a disconnected wireless network (ex: Brink-Router) in the network list, uncheck Connect automatically, click/tap on Connect, click/tap on Forget network if it fails to connect, and go to step 7 below. (see screenshots below)
NOTE: In Windows 8.1 or Windows RT 8.1, you will only be able to use Forget network on a saved wireless network profile if you are unable to connect to it. Otherwise you will need to use OPTION TWO below.

7. After a few moments the saved wireless network profile will now be removed (forgotten).
OPTION TWO 1. Open a command prompt.
2. In the command prompt, copy and paste the command below, and press Enter. (see screenshot below)
NOTE: This command will give you a list of all wireless network profiles on your PC.
netsh wlan show profiles

3. In the command prompt, type the command below, and press Enter. (see screenshot below)
NOTE: This command will delete the wireless network profile.
netsh wlan delete profile name="WirelessProfileName"
For example, if I wanted to delete my listed Brink-Router (name) wireless network profile, I would type the command below exactly.
netsh wlan delete profile name="Brink-Router"

4. When finished, you can close the command prompt if you like.
5. In some scenarios you may need to remove all the wireless network profiles stored in Windows 8.1. Luckily, you don't have to remove them one by one. That would be really awful.
All you have to do is to type this command:
netsh wlan delete profile name=* i=*.
You will see it deleting all profiles in less than a second.
Langganan:
Postingan (Atom)